This is the first part of a series of posts, where I explore and create various Arduino projects using Clojure as the main programming language.
This post will guide you through being able to connect to an Arduino board (uno), using Clojure to sends commands to to it and finally using the Arduino’s LED as a morse code transmitter.
Requirements
Hardware
- Arduino Uno
- USB cable (male to female)
- Your computer
Software
Background Knowledge
After installing Arduino IDE, Java 8 and Leiningen on your computer, your computer should be ready. But before we proceed there are a few important concepts that should be understood.
Serial Ports
The Arduino Uno board uses digital pins 0 and 1 for direct communication, it is possible to communicate with the these pins via a USB to Serial chip on the Arduino board. Thus when the Arduino board is connected via USB to a computer, it appears as serial port.
When the board is connected to your computer it will appear as serial device, and all the communication (uploading sketches or sending firmata commands) will be carried out using serial communication
Firmata
When staring up, the Arduino board runs a program (stored in it’s flash memory) called the bootloader. The bootloader carries out the following actions in the given order -
- Check to see if another program (e.g sketch) is being uploaded, if so, write the uploaded program into lower part of the flash memory.
- Run and pass control over to whatever program is stored in the lower part of the flash memory
When using the Arduino IDE to upload a program to Arduino, a reset signal is sent to the board. This triggers the bootloader to run. As per the above actions, the bootloader then notices that the IDE is attempting to upload a sketch/program, it accepts the sketch and stores the sketch/program in the lower part of the flash memory and runs it. Note: There’s a reset button on the Arduino board that can also be used to reset the board.
Firmata is a communication protocol. It allows you to
send commands (and get responses) to a microcontroller.
Arduino IDE comes with sketches/programs that implement the Firmata protocol.
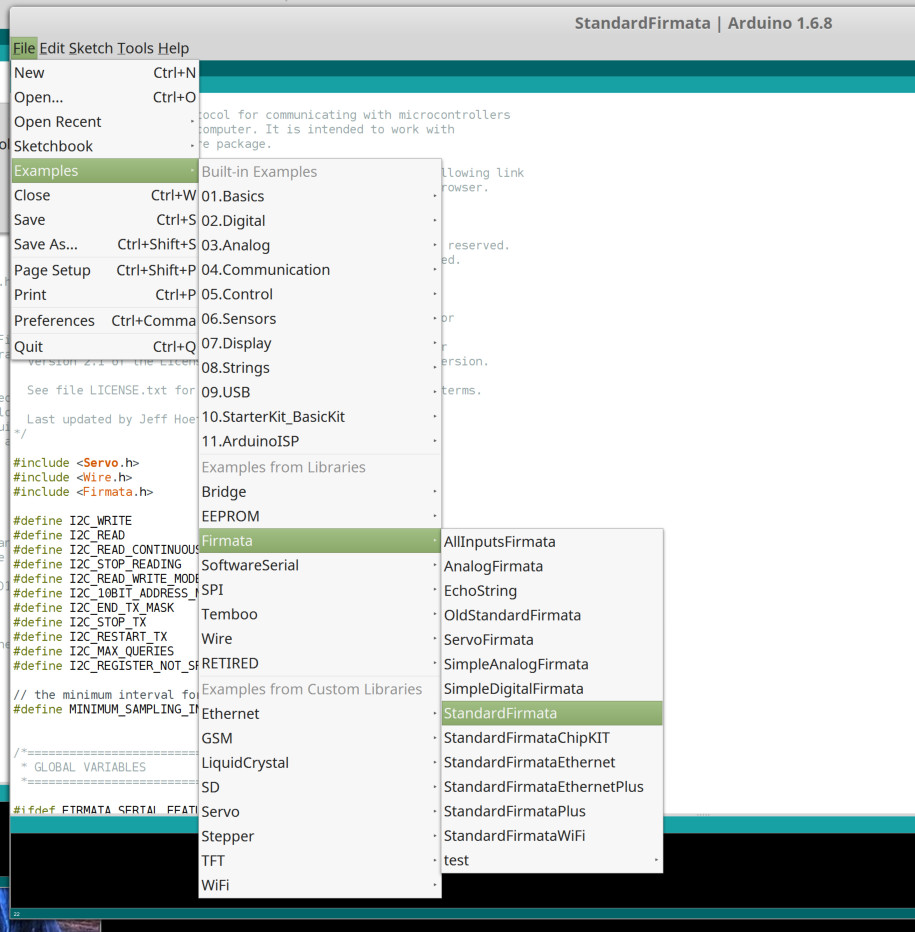
These programs are written in C++ and are under the File -> Examples -> Firmata Menu in the
Arduino IDE. Some of these Firmata sketches implement Firmata protocol over different
physical interfaces (e.g StandardFirmataWifi communicates vi a Wifi shield).
For what we are doing, the most important concept to understand is that a Firmata sketch/program is a continously running program that the Arduino bootloader will load/run. Once running, it will execute commands sent via the Firmata protocol and send responses via the Firmata protocol.
Connect your board
Connect and setup your board by following the appropriate OS guide below
If you are having problems connecting to your Arduino board please consult one of the following links
- General Trouble Shooting Guide
- If you have problems accessing the device file in Linux, consult this page (especially the “Serial port permissions” section)
Communicating via the REPL
To communicate with the Arduino board from a Clojure REPL, we’ll need to have a program constantly running on the board which will interpret Firmata commands/requests from a Firmata client.
Upload the Firmata Sketch onto the Arduino Board
After connecting the board to your computer,
We’ll upload the Firmata sketch/program onto the Arduino board, by first selecting
the File -> Examples -> Firmata -> StandardFirmata Menu Item in the Arduino IDE.

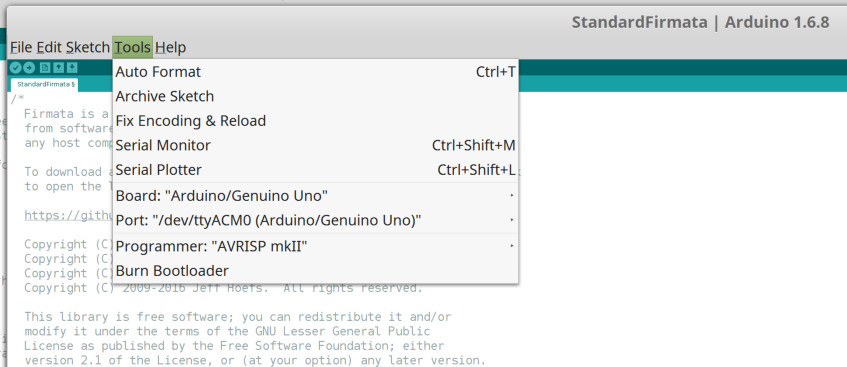
Check the Menu items Tools -> board and Tools -> port to ensure that the correct
Arduino board and device file have been selected.

Now Upload the Firmata sketch by selecting Sketch -> Upload menu item.
You should see Tx and Rx leds blinking on the board, but more importantly the Arduino IDE’s
status bar will show the progress and then the message Done uploading when the sketch
has been successfully uploaded.
Use a Clojure Firmata Client library
The client library we’ll be using is clj-firmata. Create a new project using leiningen e.g
lein new sandpit Enter the newly created directory (sandpit) and edit the project.clj to include the clj-firmata library.
 (defproject sandpit “0.1.0-SNAPSHOT”
  :description “FIXME: write description”
  :url “http://example.com/FIXME"
  :license {:name “Eclipse Public License”
            :url “http://www.eclipse.org/legal/epl-v10.html"}
  :dependencies [[org.clojure/clojure “1.7.0”]
                 [clj-firmata “2.1.1”]])
Now start up a repl
lein replRequire the firmata.core namespace from the clj-firmata library
user=> (require ‘[firmata.core :as fm])
nil
Please note the following -
- Whenever you use the clj-firmata library to communicate with the board, you’ll notice the TX and RX LEDs blink as the instructions are sent via the firmata protocol to Firmata sketch/program running on the board.
- The RX LED is associated to PIN 0
- The TX LED is associated to PIN 1
Now open a connection to your Arduino board and hold a reference to it. Note: this reference is actually a clojure map
user=> (def board (fm/open-serial-board :auto-detect))
#‘user/board
Arduino Uno’s board has a LED associated to PIN 13. We are going to switch this LED on and off. But before we proceed, we need to ensure that this PIN’s mode is set to output
user=> (fm/set-pin-mode board 13 :output)
The above expression will return the board (a clojure map) that was given to it. Note: the following expressions will return the board that they are given, for now you can ignore it
We’ll now switch the LED associated with PIN 13 on, by setting that pin’s digital value to high
user=> (fm/set-digital board 13 :high)
Then switch it off, by setting the pin’s digital value to low
user=> (fm/set-digital board 13 :low)
Congratulations!! you are now able to send instructions from a clojure repl and have them executed on the Arduino Board.
Using the Arduino Board as a basic Morse Code Signaller
What we’ve done so far is pretty basic stuff, we can now build on it to do more.
Morse code is a way of translating characters (letters, numbers) into a series of signals (tones, clicks or flashing lights).
By switching the LED attached to PIN 13 on and off, we can create a simple Morse Code signaller.
I’ve created a small clojure library for “blinking” the onboard LED (PIN 13) and for translating characters (letters and numbers) and words into Morse code.
First thing to do is to replace the clj-firmata entry, in the project.clj, with an entry for the morse code library.
 (defproject sandpit “0.1.0-SNAPSHOT”
  :description “FIXME: write description”
  :url “http://example.com/FIXME"
  :license {:name “Eclipse Public License”
            :url “http://www.eclipse.org/legal/epl-v10.html"}
  :dependencies [[org.clojure/clojure “1.7.0”]
                [com.dayooliyide/morse-code “0.1.0”]])
Now restart the repl and use the morse-code.core namespace
user=> (use ‘morse-code.core)
nil
Initialise the connection to the board.
Please note the following
Note: if not done, the first use of the api will trigger the initialisation of a connection to the board which causes some blinking of the onboard led. This might lead to some confusion hence the reason to initialise the board before using the other functions
Note: calling the init-board! fn will return a clojure map representation of the board and the connection to it
user=> (init-board!)
Now you can blink/flash the onboard LED for 1 second and then 5 seconds
user=> (blink! 1000)
nil
user=> (blink! 5000)
nil
You can flash the LED to represent a Morse dot (200 millis) or a dash (600 millis)
user=> (dot!)
nil
user=> (dash!)
nil
You can also transmit words
user=> (morse! “SOS”)
nil
And also words
user=> (morse! “Hello World”)
nil
Which brings us to the end of this post, I hope you have found it useful.